Table of Contents
Korean Fried Chicken
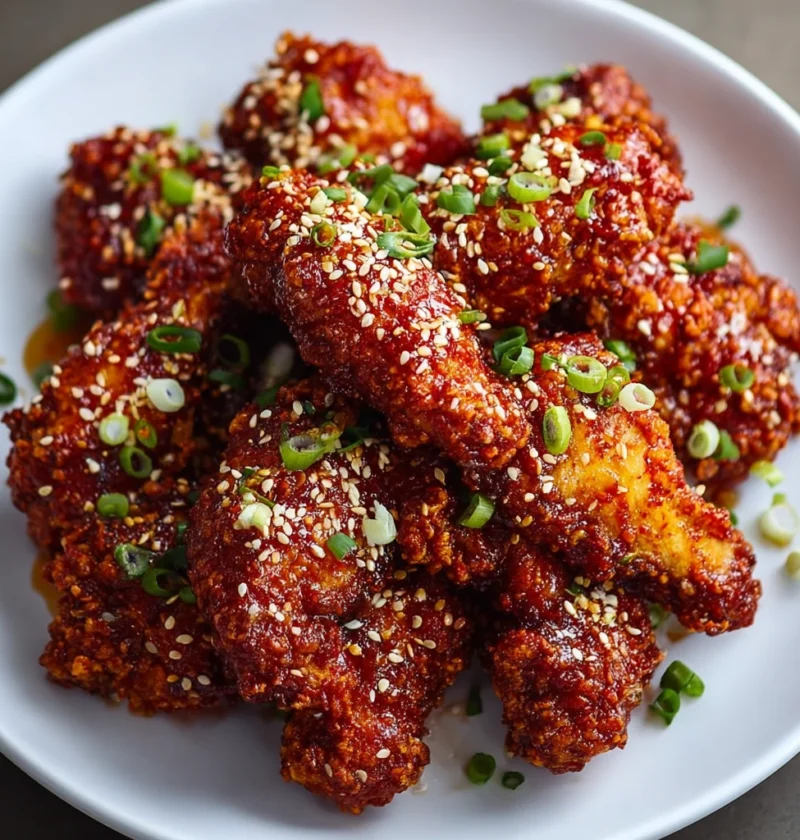
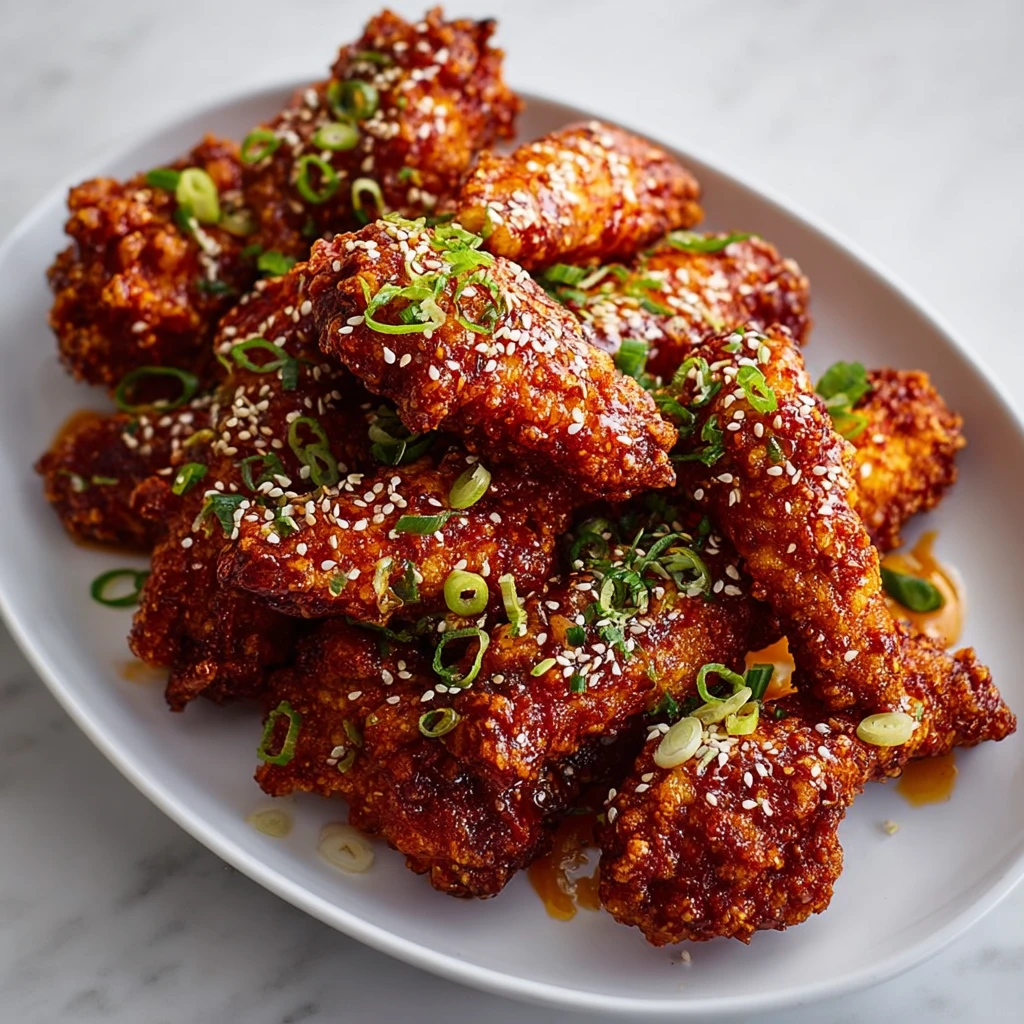
Imagine biting into a piece of chicken so crisp it shatters with the first touch—light as a whisper, yet sturdy enough to hold up to a glossy, addictive sauce that clings in perfect ribbons. That first crunch gives way to juicy, tender meat within, while the sauce hits your tongue with a symphony of sweet, spicy, tangy, and umami notes: the deep fermented warmth of gochujang, the sticky sweetness of honey, the savory depth of soy sauce, and a bright kick of fresh garlic and ginger. It’s not just fried chicken—it’s a textural and flavor experience that makes you close your eyes and sigh with pure satisfaction. Welcome to Korean fried chicken, where every bite is a celebration.
If you’ve ever ordered takeout Korean fried chicken and wished you could recreate that magic at home, today’s your lucky day. This recipe cracks the code on achieving that legendary shatter-crisp crust and that sticky, complex sauce—without a deep fryer, obscure ingredients, or hours of prep. Inspired by trusted sources like Maangchi’s authentic techniques, Kitchen Sanctuary’s crowd-pleasing tweaks, and The Kitchn’s smart shortcuts, this version balances authenticity with weeknight practicality. You’ll get restaurant-worthy results using pantry staples and a simple bowl or pot for frying.
Whether you’re feeding a crowd at game day, treating yourself to a solo indulgence, or introducing friends to the wonders of K-Food, this recipe delivers. It’s naturally adaptable (go mild or crank the heat), makes fantastic leftovers (if you’re lucky enough to have any!), and pairs beautifully with everything from ice-cold beer to crisp lettuce wraps. Most importantly, it tastes like you spent all day in the kitchen—when in reality, you’ll be eating while the oil’s still warm. Ready to transform your weeknight routine? Let’s get frying.
Why You’ll Love This Recipe
This isn’t just another fried chicken recipe—it’s your shortcut to craving-worthy Korean comfort food. Here’s why it’ll become a staple in your rotation:
- Crisp that lasts: The double-fry technique (or smart baking powder trick) creates a crust that stays shatteringly crisp for hours—even after saucing. No soggy disappointment here.
- Sauce you’ll crave: That gochujang-based sauce isn’t just spicy—it’s deeply savory, sweetly balanced, and glossy enough to make every piece look irresistible. Make it mild or fiery; it’s infinitely tweakable.
- Surprisingly simple: Uses ingredients you likely have (flour, cornstarch, garlic, ginger) plus one star player: gochujang (find it in the international aisle or online). No fermenting, no specialty equipment.
- High-protein and satisfying: Each serving packs over 25g of protein to keep you full and energized—perfect for post-workout fuel or a hearty dinner.
- Incredibly versatile: Use wings, drumsticks, boneless thighs, or even cauliflower for a vegetarian twist. Serve as appetizer, main, or meal-prep star.
- Meal-prep friendly: Fry the chicken ahead, store sauce separately, and combine just before eating for maximum crispness.
- Crowd-pleaser guaranteed: The sweet-spicy sticky profile appeals to almost everyone—adjust the heat to suit your crew. My nephew, who usually avoids “spicy” food, asks for seconds every time.
- Feels like a treat without the guilt: Compared to heavy American-style fried chicken, this version uses less batter and highlights bright, fresh flavors from ginger and garlic.
If you search for “crispy Korean fried chicken recipe” or “easy Korean fried chicken sauce,” this is the answer. It’s the kind of dish that makes you think, “Why did I wait so long to try this at home?”
Ingredients: The Building Blocks of Bliss
Korean fried chicken hinges on two elements: ultra-crispy chicken and that iconic sticky-sweet-spicy sauce. I’ve broken down both components in clear tables below, with notes on substitutions and why each ingredient matters. Remember: quality gochujang makes a difference, but don’t let perfectionism stop you—this recipe is forgiving and delicious even with simple swaps.
For the Crispy Chicken
| Ingredient | Amount | Friendly Notes & Substitutions |
|---|---|---|
| Chicken pieces | 2 lbs (about 900g) | Use wingettes/drumettes, boneless thighs cut into bite-sized pieces, or drumsticks. For wings, leave tips on for extra gelatin (they crisp up amazingly!). Pat DRY before coating—moisture is the enemy of crisp. |
| Cornstarch | ¾ cup (90g) | The crispiness MVP. Creates a lighter, crunchier crust than flour alone. Substitute potato starch 1:1 for gluten-free. |
| All-purpose flour | ½ cup (60g) | Adds structure to the cornstarch. For gluten-free, use rice flour or more potato starch. |
| Baking powder | 1 tsp | Secret weapon! Creates tiny air bubbles in the batter for ultra-light crispness. Don’t skip—it’s what makes the crust shatter. |
| Salt | 1 tsp | Enhances flavor and helps draw out moisture for better browning. |
| Black pepper | ½ tsp | Freshly cracked for floral notes. Adjust to taste. |
| Garlic powder | ½ tsp | Adds savory depth without burning (fresh garlic can darken in hot oil). Use 1 clove minced fresh if preferred. |
| Paprika | ½ tsp | Sweet paprika adds color and subtle sweetness; smoked paprika adds depth. Optional but recommended. |
| Egg | 1 large | Binds the dry ingredients to the chicken. For egg-free, use ¼ cup buttermilk or aquafaba. |
| Ice-cold water | ½ cup (120ml) | Keeps batter cold, which prevents oil absorption and maximizes crispness. Sparkling water works too! |
| Oil for frying | 2-3 inches deep | *Use neutral oil with high smoke point: peanut, canola, sunflower, or avocado. You’ll need ~4-6 cups for a deep pot.* |
For the Iconic Sauce
| Ingredient | Amount | Friendly Notes & Substitutions |
|---|---|---|
| Gochujang | 3 tbsp (45g) | The soul of the sauce—fermented chili paste with deep, complex flavor. Find it in Korean markets or online. Substitute 1 tbsp gochugaru + 1 tbsp miso + 1 tsp sugar in a pinch (but gochujang is worth it!). |
| Honey or maple syrup | 2 tbsp (30ml) | Honey gives floral notes; maple adds earthiness. For vegan, use agave or brown rice syrup. |
| Ketchup | 2 tbsp (30ml) | Adds tangy sweetness and helps thicken the sauce. Don’t skip—it balances the gochujang’s funk. |
| Soy sauce | 1½ tbsp (22ml) | Use low-sodium to control salt. For gluten-free, swap with tamari. |
| Brown sugar | 1 tbsp (12g) | Adds molasses depth. Substitute coconut sugar or white sugar + ¼ tsp molasses. |
| Garlic | 2 cloves, minced | Fresh is non-negotiable for bright, aromatic depth. Garlic powder won’t give the same pop. |
| Ginger | 1 tsp grated | Fresh ginger adds zesty warmth that cuts through richness. No fresh? Use ½ tsp ground ginger. |
| Rice vinegar | 1 tsp (5ml) | Brightens the sauce—don’t substitute with stronger vinegars (like white or apple cider) which can overpower. |
| Sesame oil | ½ tsp (2.5ml) | Finishers only! Adds nutty aroma. Regular oil won’t give the same finish. |
| Water | 2-4 tbsp (30-60ml) | Adjust for desired thickness—start with 2 tbsp, add more if sauce thickens too much as it cools. |
| Optional heat | ½-1 tsp gochugaru | Korean chili flakes for extra heat without altering flavor profile. Sambal oelek or sriracha work too. |
| Garnish | Sesame seeds, sliced scallions | Toasted sesame seeds and green onions add freshness and visual appeal. |
Note: This recipe makes about 1.5 lbs of saucy chicken (serves 3-4 as a main, 6+ as an appetizer). Easily double for crowds—fry in batches to avoid crowding the pot.
Step-by-Step Instructions: From Bowl to Bliss in 45 Minutes
Let’s break this down into manageable steps. I’ve included pro tips with each one—these are the nuances I learned from testing (and yes, I’ve had my share of soggy chicken and burnt sauce!). Read through first, then get ready to fry.
Prep Time: 20 minutes | Fry Time: 20-25 minutes | Sauce Time: 10 minutes | Total Time: 50 minutes | Servings: 3-4
Part 1: Prep the Chicken for Maximum Crisp
- Prep the chicken. Pat chicken pieces thoroughly dry with paper towels—this is non-negotiable for crispiness. If using wings, leave tips on; if using drumsticks, score the meat lightly to help it cook evenly.
→ Pro Tip: Wet chicken = steam = soggy crust. Take an extra 30 seconds to press out moisture—it makes all the difference. - Make the batter. In a large bowl, whisk together cornstarch, flour, baking powder, salt, black pepper, garlic powder, and paprika. In a separate bowl, whisk egg and ice-cold water until combined. Pour wet ingredients into dry, stirring just until combined—lumps are okay! Overmixing develops gluten, which makes the crust tough.
→ Pro Tip: Ice-cold liquid is key. It keeps the batter temperature low when it hits hot oil, preventing instant absorption and creating that signature shatter. - Coat the chicken. Add chicken to the batter, tossing to coat evenly. Let excess drip off—you want a thin, even layer, not gloopy globs.
→ Pro Tip: Work in batches if your bowl is small. Crowded chicken steams instead of fries. Use tongs or your hands (wear food-safe gloves if preferred).
Part 2: Fry to Crispy Perfection
- Heat the oil. Pour oil into a heavy-bottomed pot (Dutch oven works great) until it’s 2-3 inches deep. Clip on a thermometer and heat to 325°F (163°C).
→ Pro Tip: Temperature control is everything. Too cool = greasy chicken; too hot = burnt outside/raw inside. Adjust heat as needed to maintain temp. - First fry (cook through). Working in batches to avoid crowding, add chicken to the oil. Fry 8-10 minutes, stirring occasionally, until chicken is cooked through (internal temp 165°F/74°C) and crust is pale gold. Remove with a slotted spoon or spider strainer to a wire rack set over a baking sheet (this keeps air circulating under the chicken, preventing sogginess).
→ Pro Tip: Don’t rush this step! Undercooked chicken is unsafe; overcooked chicken is dry. Use a thermometer for peace of mind. - Rest the chicken. Let fried chicken rest for 5-10 minutes while you make the sauce. This allows the interior temp to stabilize and the crust to set up—critical for the second fry.
→ Pro Tip: Patience pays off. Skipping this step can lead to less-crisp results after saucing. - Second fry (crisp to perfection). Increase oil heat to 375°F (191°C). Return chicken to the oil and fry 2-3 minutes until deep golden brown and shatteringly crisp. Remove to the wire rack.
→ Pro Tip: This second fry at higher temp is what creates the iconic crisp crust without overcooking the interior. Listen for that satisfying sizzle!
Part 3: Make the Sauce While Chicken Rests
- Combine sauce ingredients. In a small saucepan over medium heat, whisk together gochujang, honey, ketchup, soy sauce, brown sugar, minced garlic, grated ginger, rice vinegar, and 2 tbsp water.
→ Pro Tip: Whisking first prevents lumps. Taste now—it should be sweet, savory, and slightly tangy with a noticeable gochujang kick. - Simmer to sticky perfection. Bring to a gentle simmer, then reduce heat to low. Cook 3-5 minutes, stirring frequently, until sauce thickens to a glossy, syrup-like consistency (it should coat the back of a spoon). Remove from heat.
→ Pro Tip: Sauce thickens fast! Pull it off the heat the second it coats the spoon—overcooking makes it gluey. If it gets too thick, whisk in 1 tsp water at a time. - Finish the sauce. Stir in sesame oil and optional extra heat (gochugaru/sriracha) if using. Taste and adjust:
- Too sweet? Add ½ tsp rice vinegar or soy sauce.
- Not sweet enough? Add ½ tsp honey.
- Too thick? Whisk in 1 tsp warm water.
- Want more depth? Add ¼ tsp garlic powder or pinch of black pepper.
Part 4: Sauce and Serve Immediately
- Sauce the chicken. Place crispy chicken in a large bowl. Pour warm sauce over, tossing gently to coat every piece evenly. Work quickly—the sauce will start to set as it cools.
→ Pro Tip: Sauce chicken just before serving for maximum crispness. If prepping ahead, store chicken and sauce separately and combine 10-15 minutes before eating. - Garnish and devour. Transfer saucy chicken to a serving bowl or platter. Sprinkle generously with toasted sesame seeds and sliced scallions. Serve immediately with lemon wedges, pickled radish, or crisp lettuce wraps.
Tips for Success: Achieve That Shatter-Crisp Crust Every Time
Even small tweaks make or break Korean fried chicken. These are the hard-won lessons from my kitchen—apply them, and you’ll nail that elusive crisp texture consistently.
- Dry chicken is paramount: Moisture creates steam, which prevents crisping. After rinsing (if needed), pat pieces bone-dry with paper towels—press firmly into crevices. For extra insurance, air-dry uncovered in the fridge for 30 minutes.
- Ice-cold batter = less oil absorption: Cold batter hits hot oil and sets instantly, forming a barrier that keeps oil out. Keep your egg/water mixture chilled until ready to use.
- Don’t overcrowd the pot: Crowding drops oil temperature dramatically, leading to greasy, soggy chicken. Fry in batches—give pieces room to float freely.
- Maintain oil temperature: Use a clip-on thermometer and adjust heat as needed. If temp drops >25°F when adding chicken, wait for it to climb back before adding more.
- Wire rack is your friend: Resting fried chicken on a rack (not paper towels) allows air to circulate underneath, preventing steam from softening the crust. Paper towels trap moisture—use them only to blot excess oil after saucing if needed.
- Sauce temperature matters: Cold sauce hitting hot chicken creates steam that softens the crust. Warm sauce gently—it should be pourable but not hot enough to sputter.
- Double-fry for ultimate crisp: The first fry cooks the chicken through; the second fry at higher temp crisps the exterior without overcooking the interior. Skip this, and you’ll get decent crisp but not that legendary shatter.
- Season the batter well: Don’t be shy with salt and pepper in the batter—it seasons the chicken from within. Under-seasoned batter = bland chicken, no matter how good the sauce.
- Use fresh ginger and garlic: Their bright, volatile compounds are key to the sauce’s complexity. Powdered versions lack the same pop and can taste dull.
- Toast your sesame seeds: Dry-toast seeds in a pan over medium heat for 2-3 minutes until fragrant and golden. Raw sesame seeds taste bland; toasted ones add nutty depth.
- Have your garnish ready: Scallions wilt quickly in hot sauce. Slice them just before serving and sprinkle on at the very last second for maximum freshness.
Variations & Substitutions: Make It Yours
This recipe is a fantastic foundation—here’s how to adapt it for different tastes, diets, or what’s in your fridge. All swaps keep the core technique intact, so you’ll still get that amazing crisp and saucy goodness.
Heat Level Adjustments
- Mild & family-friendly: Reduce gochujang to 2 tbsp, omit gochugaru/sriracha, and add 1 tbsp extra honey. Serve with extra sesame seeds and scallions for freshness.
- Medium kick (as written): 3 tbsp gochujang + ½ tsp gochugaru delivers noticeable warmth without overwhelming heat—perfect for most palates.
- Fire in the hole: Increase gochujang to 4 tbsp, add 1-2 tsp gochugaru or 1 tsp sriracha to the sauce, and serve with extra chili flakes on the side. For serious heat, add ½ tsp cayenne pepper to the batter.
- Smoky depth: Add ½ tsp smoked paprika to the batter or 1 tsp chipotle in adobo (minced) to the sauce.
Dietary Adaptations
- Gluten-free: Use 100% potato starch or rice flour for the batter (skip all-purpose flour). Ensure your gochujang, soy sauce (use tamari), and other sauces are certified gluten-free.
- Dairy-free: Already dairy-free! Just confirm your gochujang and sauces don’t contain hidden dairy (most don’t).
- Low-FODMAP: Use garlic-infused oil (make by warming oil with smashed garlic cloves, then straining) instead of fresh garlic in both batter and sauce. Omit onion if your recipe includes it (this one doesn’t). For ginger, use ½ tsp ground ginger.
- Paleo/Whole30: Use almond flour + tapioca starch for batter (ratio 2:1), ensure gochujang is sugar-free (or use date paste sub), and swap soy sauce for coconut aminos.
- Egg-free: Replace egg with ¼ cup buttermilk or aquafaba (chickpea brine). The batter may be slightly thinner—add 1 tbsp more starch if needed.
Protein Swaps (Keep the Technique!)
- Boneless, skinless chicken thighs: Cut into 1.5-inch pieces. They’re juicier and more forgiving than breast—fry same timing.
- Chicken breast: Cut into bite-sized pieces, but be careful not to overcook—aim for 160°F internal temp (it’ll carryover to 165°F). Consider pounding thin for even cooking.
- Cauliflower bites: For vegetarian option, use same batter on cauliflower florets. Fry at 325°F for 4-5 minutes first fry, 375°F for 2-3 minutes second fry. Sauce as directed.
- Tofu “chicken”: Press extra-firm tofu, cut into 1-inch cubes, freeze overnight, then thaw and squeeze dry (this creates a spongy texture that holds batter well). Fry as chicken.
- Seafood twist: Use large shrimp (peeled, deveined) or scallops. Reduce fry time dramatically—shrimp need just 2-3 minutes total at 350°F; scallops 90 seconds per side.
Global Flavor Twists
- Mexican-inspired: Add ½ tsp cumin and ¼ tsp chili powder to batter. Sauce with 2 tbsp gochujang + 1 tbsp mole paste + 1 tbsp honey. Garnish with cilantro and lime.
- Indian-inspired: Add ½ tsp garam masala to batter. Sauce with 2 tbsp gochujang + 1 tbsp tamarind paste + 1 tbsp honey. Garnish with fresh cilantro.
- Mediterranean: Add 1 tsp dried oregano + ½ tsp lemon zest to batter. Sauce with 2 tbsp gochujang + 1 tbsp lemon juice + 1 tbsp honey. Garnish with parsley and lemon wedges.
What to Serve With It: Build Your Ultimate Spread
Korean fried chicken is rich, savory, and slightly sweet—so balance it with fresh, crisp, or cooling elements. Whether you’re game-day feeding or enjoying a solo night in, these pairings elevate the experience without stealing the show.
Fresh & Crunchy Sides (Cut Through Richness)
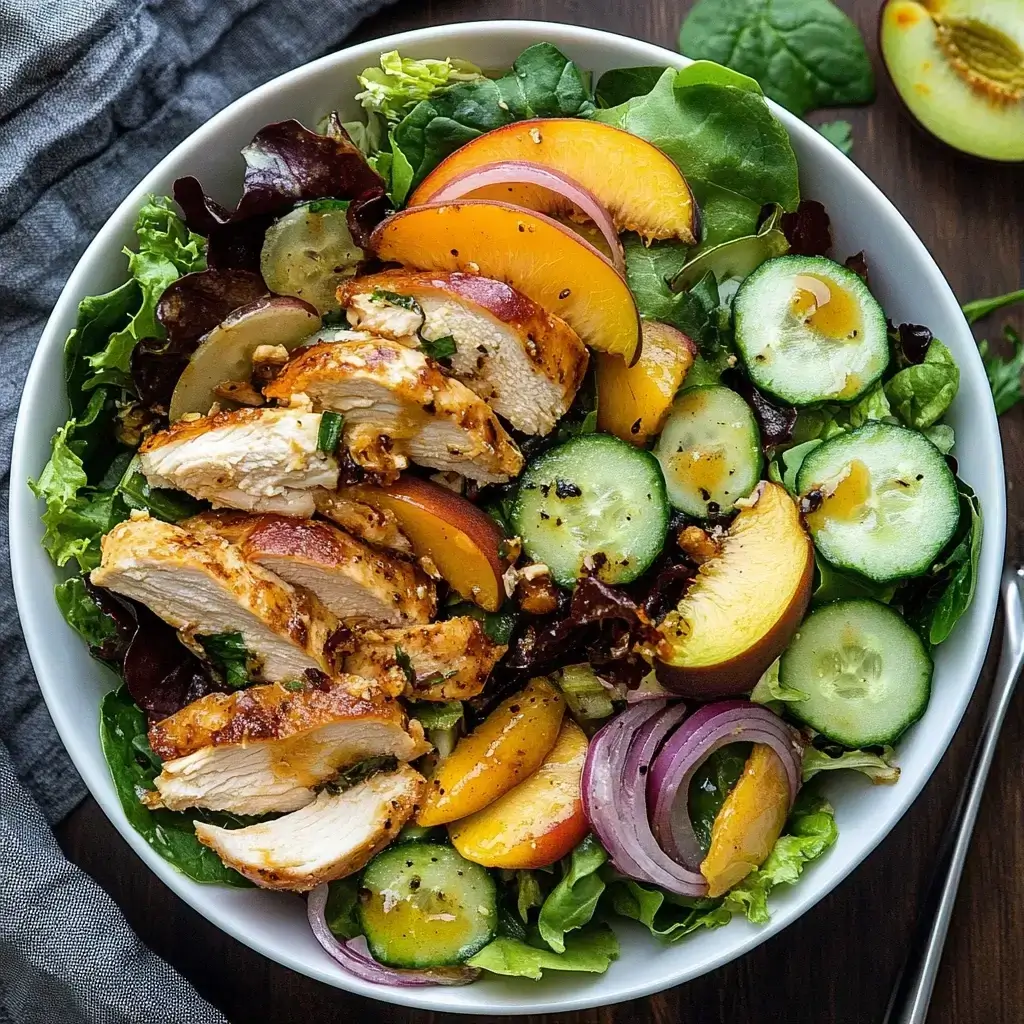
- Simple cucumber salad: Thinly slice cucumber, toss with rice vinegar, 1 tsp sugar, pinch of salt, and sesame seeds. Ready in 5 minutes—adds cool crunch.
- Korean-inspired slaw: Shred cabbage and carrot, toss with rice vinegar, honey, sesame oil, and pinch of sugar. Chill 20 minutes for maximum crispness.
- Pickled radish (danmuji): Buy pre-made or quick-pickle daikon radish in rice vinegar, sugar, and salt for 30 minutes. Bright and refreshing.
- Lettuce cups: Use butter lettuce or romaine leaves to wrap chicken with rice, ssamjang (soy-chili paste), and raw garlic or scallions. Fun, interactive, and cuts richness.
- Kimchi: The classic pairing! Its spicy, funky tang cuts through the chicken’s richness perfectly. Serve well-chilled.
Hearty Sides (For Big Appetites)
- Steamed rice: Short-grain or jasmine rice—essential for saucy chicken. Keep it warm in a rice cooker or pot.
- Corn cheese: A Korean street food favorite—mix canned corn with mayo, sugar, and shredded cheese, then broil until bubbly. Sweet, savory, and addictive.
- Sweet potato fries: Toss cut sweet potatoes with oil, salt, and pepper. Bake at 425°F for 25-30 minutes until crispy. The sweetness complements the spicy chicken.
- Japchae: Stir-fried glass noodles with veggies and soy-sesame sauce—make ahead; it’s delicious cold or room temp.
Cooling Drinks (Balance the Heat)
- Non-alc: Iced barley tea (bori-cha), sparkling water with yuzu or lemon, or a Korean pear smoothie (blend Asian pear with milk and honey).
- Alc: A crisp lager (like Cass or Hite), a light soju cocktail (soju + grapefruit soda), or a dry riesling. The acidity and bubbles cut through richness beautifully.
Authentic Korean Spread Ideas
- Anju-style platter: Serve chicken with steamed rice, kimchi, raw scallions, raw garlic cloves, and ssamjang for DIY lettuce wraps.
- Bar snack spread: Pair with tteokbokki (spicy rice cakes), odeng (fish cake skewers), and a bowl of kongnamul muchim (seasoned soybean sprouts).
- Leftover magic: Chop cold chicken into fried rice or top a bibimbap bowl with it, veggies, fried egg, and gochujang sauce.
My go-to game-day spread: Korean fried chicken + cucumber salad + steamed rice + ice-cold lager + kimchi on the side. Feels indulgent but comes together while the chicken rests.
Storage & Reheating: Keep It Crispy for Leftovers
Leftover Korean fried chicken is a gift—but only if you store it smartly. Sauce is the enemy of crispness (it turns the crust soggy in hours), so separate components is key. Follow these steps, and you’ll enjoy near-restaurant-quality reheated chicken for 3-4 days.
How to Store
- Separate immediately: As soon as you’re done eating, divide chicken and sauce into separate airtight containers.
- Cool completely: Let chicken sit at room temperature no longer than 2 hours (for safety), then refrigerate.
- Chicken storage: Place crispy (unsauced) chicken in a container lined with a paper towel to absorb any oil. It’ll keep 3-4 days in the fridge.
- Sauce storage: Keep sauce in a small jar or container. It thickens when chilled—just warm slightly before using.
- Freezing for later:
- Chicken: Freeze unsauced, crispy chicken in a single layer on a baking sheet, then transfer to a freezer bag. Keeps up to 2 months. Thaw overnight in fridge.
- Sauce: Freezes beautifully in ice cube trays (for easy portions) or small containers. Keeps up to 3 months. Thaw and warm gently.
- Never freeze sauced chicken: The texture turns to mush upon thawing.
How to Reheat (Without Losing the Crisp)
- Oven method (best texture):
- Preheat oven to 300°F (150°C).
- Place chicken on a wire rack over a baking sheet (allows air circulation).
- Heat 10-15 minutes until warmed through but not cooked further.
- Optional but recommended: Broil 1-2 minutes for crisp exterior—watch closely!
- Air fryer method (quick & crispy):
- Set air fryer to 350°F (175°C).
- Place chicken in basket (don’t overcrowd).
- Heat 5-7 minutes, shaking basket halfway through.
- Skillet method (stovetop fix):
- Heat 1 tsp oil in skillet over medium-low.
- Add chicken, cover with lid, and heat 3-4 minutes per side until warmed through.
- Uncover last 60 seconds to crisp exterior.
- Avoid microwave if possible: It makes chicken rubbery. If you must, use 30% power, cover with damp paper towel, and heat in 20-second bursts, checking frequently.
Pro Tips for Leftover Magic
- Revive soggy chicken: If sauce made it limp, reheat plain chicken using oven/air fryer method above, then sauce just before eating.
- Make chicken fried rice: Dice cold chicken, sauté with cooked rice, peas, carrots, and soy sauce—top with a fried egg.
- Create a chicken bowl: Layer reheated chicken over rice or greens with shredded cabbage, carrots, cucumber, and a drizzle of sauce.
- Sauce too thick after chilling: Warm 10 seconds in microwave, whisk in ½ tsp warm water or rice vinegar.
- Add freshness before eating: A handful of raw baby spinach or arugula tossed in at the end adds brightness and nutrients.
Nutrition Facts: Fuel Your Body Right
This recipe is surprisingly balanced—especially when paired with fresh sides. Values below are for one serving (about 5oz saucy chicken, ~1/4 of recipe), assuming:
- Chicken thigh pieces (higher fat than breast but juicier)
- Standard batter and sauce (with honey)
- No additional oil absorbed beyond frying
| Nutrient | Amount | % Daily Value* | Why It Matters |
|---|---|---|---|
| Calories | 320 | 16% | Satisfying without being heavy—ideal for lunch, dinner, or hearty snack. |
| Protein | 22g | 44% | Chicken is a lean protein powerhouse—supports muscle and keeps you full. |
| Fat | 18g | 23% | Mix of saturated and unsaturated; includes healthy fats from sesame oil. |
| Carbohydrates | 18g | 6% | Primarily from batter and sauce—pair with veggie sides for fiber balance. |
| Fiber | 1g | 4% | Get fiber from sides like cabbage slaw, cucumber salad, or steamed broccoli. |
| Sugar | 12g | — | From honey/ketchup in sauce—no refined sugar added to batter. |
| Sodium | 680mg | 29% | From soy sauce, salt in batter, and sauce—use low-sodium soy to reduce. |
| Potassium | 380mg | 8% | Chicken and veggies contribute—great for blood pressure balance. |
| Iron | 1.2mg | 7% | Supports oxygen transport—especially important for active lifestyles. |
| Vitamin B6 | 0.5mg | 29% | Chicken is rich in B6, which supports brain health and energy metabolism. |
Based on a 2,000-calorie diet. Values vary based on chicken cut and specific ingredients used.
Dietary Highlights:
- ✅ Naturally dairy-free: No dairy in batter or sauce—safe for lactose intolerance.
- ✅ Gluten-free adaptable: Easy to make with potato/rice flour and tamari (see Variations).
- ✅ High-protein: Ideal for post-workout recovery or satiety-focused eating.
- ✅ Rich in key nutrients: Especially selenium and niacin from chicken.
- ⚠️ Watch sodium: If salt-sensitive, use low-sodium soy sauce and reduce added salt in batter by half.
- 💡 Boost the meal: Add a big salad or steamed veggies for fiber, vitamins, and volume without many calories.

Common Mistakes to Avoid (Learn from My Soggy Chicken Saga)
Even experienced cooks slip up—here are the pitfalls I see most often, plus how to dodge them. Avoid these, and your Korean fried chicken will be consistently crisp and saucy-perfect.
Skipping the pat-dry step: Surface moisture prevents batter adhesion and creates steam instead of crisp. You’ll get pale, sad chicken instead of shattery-crisp perfection. Fix: Pat chicken bone-dry with paper towels—press firmly into every crevice.
Using warm or room-temp batter: Warm batter absorbs too much oil, creating a greasy, thick crust. Fix: Keep egg/water mixture ice-cold until ready to use—chill the bowl if your kitchen is warm.
Overcrowding the fry pot: Crowding drops oil temperature dramatically, leading to greasy, soggy chicken that never crisps properly. Fix: Fry in batches—give pieces room to float freely. Use a thermometer to monitor temp.
Neglecting the second fry: Skipping the high-temp second fry means you’ll get cooked-through chicken but not that iconic shatter-crisp crust. Fix: Always do the second fry at 375°F/191°C for 2-3 minutes—it’s non-negotiable for texture.
Saucing too early: Saucing chicken immediately after frying traps steam, softening the crust within minutes. Fix: Let chicken rest 5-10 minutes after second fry before saucing—this lets the crust set up.
Using thin, watery sauce: Sauce that’s too thin won’t cling and makes chicken soggy fast. Fix: Simmer sauce until it coats the back of a spoon thickly—it should slowly drip off, not run.
Overcooking the chicken: Especially with breast meat, it’s easy to go from juicy to dry and stringy in seconds. Fix: Use a thermometer—pull chicken at 160°F internal temp (it’ll carryover to 165°F). Thighs are more forgiving but still check.
Skipping the wire rack for resting: Resting chicken on paper towels traps steam underneath, softening the bottom crust. Fix: Always rest fried chicken on a wire rack set over a baking sheet—air circulation keeps all sides crisp.
Using old or rancid oil: Oil that’s been used too many times imparts off-flavors and doesn’t heat evenly. Fix: Sniff oil before using—fresh neutral oil smells clean. Discard if it smells sour, fishy, or like crayons.
Forgetting to garnish: A sprinkle of sesame seeds and scallions isn’t just pretty—it adds nutty depth and fresh brightness that elevates the whole dish. Fix: Always finish with garnish—it takes 10 seconds and makes a huge difference.
FAQ: Your Korean Fried Chicken Questions Answered
I’ve gathered the most common queries from recipe testers and readers—here are clear, practical answers to help you succeed every time.
Q: Can I use chicken breast instead of thighs?
A: Yes! Cut breast into bite-sized pieces (about 1.5-inch cubes). Since breast is leaner and cooks faster, reduce fry times slightly: first fry 6-8 minutes at 325°F, second fry 2 minutes at 375°F. Watch closely—it can go from juicy to dry quickly. Thighs are more forgiving, but breast works if you’re careful.
Q: My batter isn’t sticking—what am I doing wrong?
A: Two likely culprits:
- Chicken wasn’t dry enough: Moisture creates a barrier between batter and meat. Pat pieces bone-dry before coating—this is critical.
- Batter is too thin: If your egg/water ratio is off, batter won’t adhere. Whisk wet ingredients first, then add to dry—it should be thick enough to coat a spoon thinly.
Pro tip: Let battered chicken sit for 5 minutes before frying—this helps the batter set up and adhere better.
Q: How do I make this less spicy for kids or spice-averse eaters?
A: Easily! Reduce gochujang to 1½-2 tbsp, omit any extra gochugaru/sriracha, and increase honey to 3 tbsp. The sauce will be sweet, tangy, and mildly savory—perfect for little ones. Serve with extra sesame seeds and scallions for freshness.
Q: Can I bake this instead of frying for a healthier version?
A: You can, but you won’t get the same shatter-crisp texture. For oven-baked:
- Toss battered chicken with 1 tsp oil.
- Spread on wire rack over baking sheet.
- Bake at 425°F for 20-25 minutes, flipping halfway, until crispy and cooked through.
- Sauce as directed.
It’ll be tasty but more “crispy-tender” than shattery. For true crisp, frying or air-frying is best.
Q: How long does the sauce last in the fridge?
A: Store in an airtight container for up to 2 weeks. It may thicken or separate—just whisk gently before using. Freeze in ice cube trays for easy portions (thaw 1-2 cubes at a time).
Q: What if I don’t have gochujang?
A: While gochujang is irreplaceable for authentic depth, in a pinch:
- Mix 1 tbsp miso paste + 1 tbsp Sriracha or sambal oelek + 1 tsp sugar + 1 tsp soy sauce.
- Or use 2 tbsp gochugaru (Korean chili flakes) + 1 tbsp soy sauce + 1 tbsp honey + 1 tsp rice vinegar.
The flavor won’t be identical, but it’ll still be delicious! For best results, seek out gochujang—it’s worth it.
Q: Why is my chicken greasy instead of crispy?
A: Almost always an oil temperature issue:
- Oil too cool (<325°F): Chicken absorbs oil instead of instantly sealing.
- Oil not hot enough for second fry (<375°F): Crust doesn’t set quickly enough.
Fix: Use a clip-on thermometer and adjust heat as needed. If temp drops >25°F when adding chicken, wait for it to climb back before adding more.
Q: Can I make the batter ahead of time?
A: Yes—but with caveats. Mix dry ingredients (starches, flour, leaveners, spices) up to 3 days ahead and store in an airtight container. Keep wet ingredients (egg/water) separate until ready to fry. Combine just before coating chicken. Pre-mixed batter can lose leavening power if stored too long.
Q: How do I know when the chicken is done without a thermometer?
A: For thighs/drumsticks:
- Juices run clear when pierced with a fork (no pink).
- Meat feels firm but springs back slightly when pressed.
- Internal color is opaque white/tan, not pink or translucent.
For breast: Look for opaque white throughout with no translucency. When in doubt, use a thermometer—it’s the only way to be 100% sure, especially since carryover heat matters.
Q: What oil is best for frying?
A: Use a neutral oil with high smoke point:
- Peanut oil: Classic choice—high smoke point (450°F), neutral flavor.
- Canola/sunflower: Affordable, neutral, smoke point ~400-450°F.
- Avocado oil: Highest smoke point (~520°F), mild butter-like note.
Avoid olive oil (too low smoke point, flavors can turn bitter) or butter (burns easily).
Q: My sauce is too thick/thick after cooling—how do I fix it?
A: Too thick? Whisk in ½ tsp warm water or rice vinegar at a time until it reaches a glossy, pourable consistency (should slowly drip off a spoon). Remember: it thickens more as it cools, so err on the side of slightly thinner. Too thin? Simmer uncovered for 1-2 minutes longer while stirring constantly.
Conclusion: Your Crispy Adventure Awaits
There you have it—your complete guide to making Korean fried chicken that’s shatteringly crisp, saucy-sweet-spicy, and absolutely addictive, all from your home kitchen. This recipe isn’t just about following steps; it’s about understanding the why behind each technique—the ice-cold batter, the double-fry method, the sauce-thickening simmer—so you can adapt and innovate with confidence. Whether you’re cooking for a crowd on game day, treating yourself to a solo indulgence, or sharing plates with friends over laughter and cold drinks, this dish delivers on flavor, texture, and that incredible “I made this!” pride.
I’ve shared my tested tips, timing guides, and variations not to box you in, but to give you the freedom to make it yours. Swap proteins based on what’s on sale, adjust the heat to match your mood, or turn it into a meal-prep star with separate storage for chicken and sauce. Serve it with lettuce wraps and kimchi for an authentic experience, or pair it with cucumber salad and steamed rice for a balanced weeknight dinner. The magic lies in the balance: quality protein, crisp technique, and that iconic sauce that clings like a flavorful hug.
Now, it’s your turn. Grab that chicken, mix that batter, and listen for that first glorious sizzle when it hits the oil. Watch as the crust transforms from pale to golden, then to deep, shattery brown. Smell the garlic and ginger blooming in the sauce as it simmers. Then, toss that crispy chicken in the glossy red sauce, sprinkle with sesame seeds and scallions, and take that first bite. Notice how the crust shatters, how the sauce clings in perfect ribbons, how the sweet, spicy, tangy, and umami notes dance on your tongue. That’s the taste of a job well done—and a meal worth savoring.
If you try this recipe, I’d love to hear how it turned out! Drop a comment below telling me what you tweaked (did you go extra crispy with double potato starch? add a whisper of smoked paprika? serve it with ssamjang in lettuce wraps?), or tag me in your photo on social media—I’m always inspired by your creations. And if this chicken became your new favorite, please share this post with a friend who needs an easy, impressive dinner idea. Sharing is how we grow this little corner of the internet into a place where everyone feels welcome to fry, eat, and enjoy.
Hungry for more? Try these next:
Happy frying, friends. May your oil be hot, your crust shattery, and your plate full of laughter and incredible food.

Korean Fried Chicken Recipe
Experience the perfect blend of crispy, succulent chicken coated in a mouthwatering sweet and spicy sauce with this Korean Fried Chicken recipe. A delightful fusion of Korean flavors and crunchy texture, this dish will impress your family and friends.
Ingredients
- Chicken wings or boneless chicken pieces
- Cornstarch
- Soy sauce
- Rice vinegar
- Brown sugar
- Garlic, minced
- Ginger, grated
- Gochujang (Korean chili paste)
- Vegetable oil
- Green onions, chopped
- Sesame seeds
- Crushed red pepper flakes
Directions
- Start by preparing the chicken pieces, ensuring they are dry before coating them in cornstarch.
- In a bowl, mix soy sauce, rice vinegar, brown sugar, garlic, ginger, and gochujang to create the sauce.
- Heat vegetable oil in a pan and fry the chicken until golden and crispy.
- Toss the fried chicken in the prepared sauce until well coated.
- Garnish with chopped green onions, sesame seeds, and crushed red pepper flakes for an extra kick.
- Serve hot and enjoy the delightful combination of crispy chicken and flavorful sauce.