Table of Contents
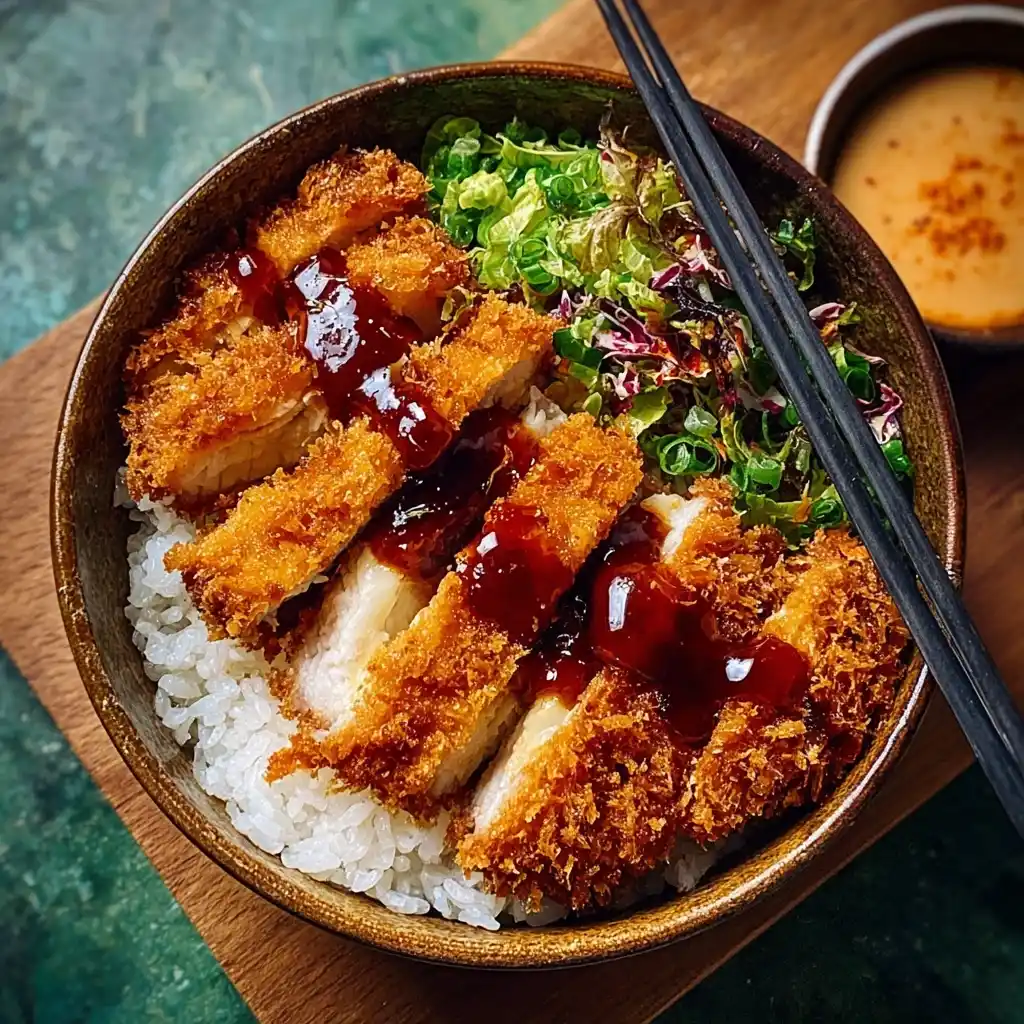
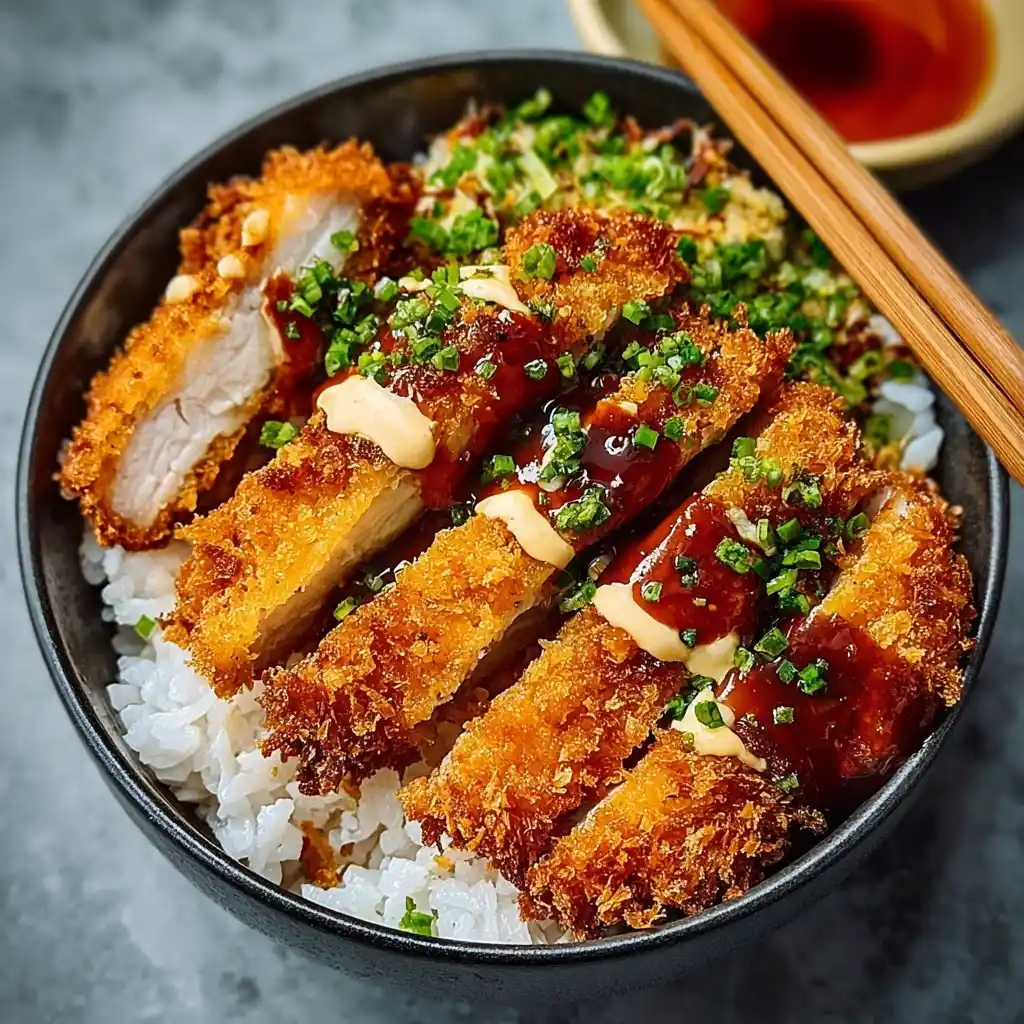
Japanese Katsu Bowls
Picture this: golden, crispy breaded cutlets with a shattering crust that gives way to juicy, tender meat. Steaming white rice that soaks up the most incredible savory-sweet sauce. Every bite delivers that perfect combination of textures – crunchy, soft, and satisfying all at once. This is what Japanese katsu bowls are all about.
These quick Japanese katsu bowls aren’t your average weeknight dinner. The panko coating creates an incredibly light, crispy crust that stays crunchy even after being drizzled with sauce. The meat inside stays juicy and flavorful, while the rice provides the perfect base to soak up every drop of that rich, umami-packed tonkatsu sauce.
What makes this recipe brilliant is how it delivers authentic Japanese flavors without requiring specialty equipment or hard-to-find ingredients. You get restaurant-quality results in about 30 minutes using techniques that are surprisingly simple once you understand them. The key is in the breading method and getting the oil temperature just right.
Whether you’re making chicken katsu for the kids, pork katsu for traditionalists, or trying the vegetarian tofu version, these Japanese katsu bowls work for everyone. They’re the kind of meal that makes people think you spent hours cooking when it really took less time than waiting for delivery.
Why These Will Become Your Weeknight Hero
• Ready in 30 minutes – Faster than most takeout and infinitely better
• Restaurant-quality crunch – Panko creates that signature light, crispy texture
• Budget-friendly – Costs a fraction of ordering out
• Kid-approved – Even picky eaters love the crispy, crunchy coating
• Customizable protein – Works with chicken, pork, tofu, or fish
• Perfect portion control – Easy to scale up or down
• Impressive presentation – Looks like it came from a Japanese restaurant
• Make-ahead friendly – Bread ahead and fry when ready
• Crowd-pleaser – Perfect for family dinners or entertaining
• Versatile serving – Works as bowls, sandwiches, or bento boxes
• Authentic flavor – Tastes like the real deal from Japan
• Simple technique – Easier than you think once you try it
Everything You Need for Katsu Perfection
For the Katsu:
- 4 boneless chicken breasts or pork loin cutlets (about 1½ pounds)
- 1 teaspoon salt
- ½ teaspoon black pepper
- ½ teaspoon garlic powder
- 1 cup all-purpose flour
- 3 large eggs, beaten
- 2 cups panko breadcrumbs
- Vegetable oil for frying (about 2 cups)
For the Rice:
- 3 cups cooked Japanese short-grain rice
- 2 tablespoons rice vinegar
- 1 tablespoon sugar
- 1 teaspoon salt
For the Tonkatsu Sauce:
- ½ cup ketchup
- 3 tablespoons Worcestershire sauce
- 2 tablespoons soy sauce
- 2 tablespoons sugar
- 1 tablespoon mirin
- 1 teaspoon Dijon mustard
- ½ teaspoon garlic powder
For Assembly:
- 4 cups shredded cabbage
- 2 tablespoons rice vinegar
- Pinch of salt
- 4 soft-boiled eggs, halved
- 2 scallions, sliced thin
- Pickled ginger (optional)
- Sesame seeds for garnish
Optional Additions:
- Japanese curry sauce
- Spicy mayo
- Shredded carrots
- Cucumber slices
- Nori strips
Step-by-Step Instructions for Perfect Japanese Katsu Bowls
Prep the Meat (8 minutes): If using chicken breasts, butterfly them by slicing horizontally through the middle, being careful not to cut all the way through. Open like a book and pound to an even ½-inch thickness between plastic wrap. This ensures quick, even cooking. For pork, simply pound to ½-inch thickness. Season both sides with salt, pepper, and garlic powder.
Set Up Breading Station (3 minutes): Arrange three shallow dishes: flour in the first, beaten eggs in the second, and panko breadcrumbs in the third. This assembly line makes breading efficient and less messy. Have a large plate ready for the breaded cutlets.
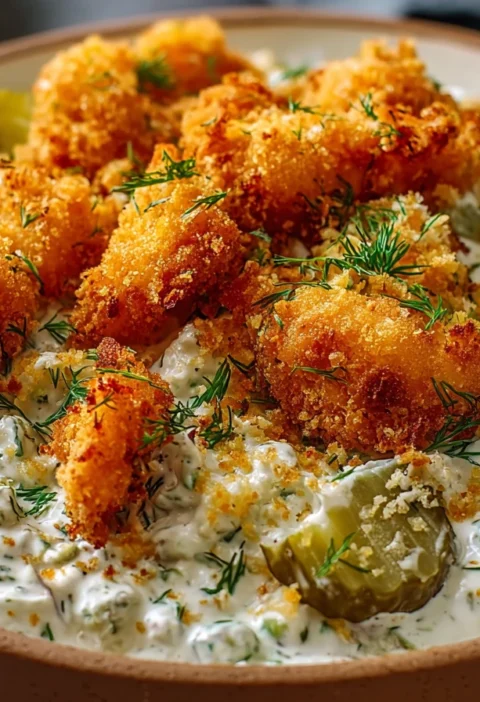
Bread the Cutlets (5 minutes): Pat the meat completely dry – this is crucial for breading to stick. Dredge each piece first in flour, shaking off excess. Dip in beaten egg, letting excess drip off. Finally, press firmly into panko on both sides, ensuring complete coverage. The coating should be thick and even. Place on the prepared plate.
Make the Tonkatsu Sauce (3 minutes): While the oil heats, whisk together ketchup, Worcestershire sauce, soy sauce, sugar, mirin, mustard, and garlic powder in a small bowl. Taste and adjust sweetness or tanginess to your preference. This sauce can be made days ahead and stored in the refrigerator.
Heat the Oil (5 minutes): Pour oil into a large, deep skillet to a depth of about 1 inch. Heat over medium-high heat to 350°F – use a thermometer for accuracy. Test with a pinch of panko – it should sizzle immediately and float. Proper temperature is critical for crispy, not greasy, katsu.
Fry the Katsu (10 minutes): Carefully add cutlets to the hot oil, working in batches to avoid overcrowding. Fry for 3-4 minutes per side until deep golden brown and the internal temperature reaches 165°F for chicken or 145°F for pork. The coating should be crispy and the meat cooked through. Transfer to a wire rack – never paper towels which make the bottom soggy.
Prepare the Slaw (3 minutes): While the katsu drains, toss shredded cabbage with rice vinegar and a pinch of salt. This simple slaw adds crunch and freshness that cuts through the richness of the fried cutlet.
Slice the Katsu (1 minute): Let the fried cutlets rest for 2-3 minutes, then slice crosswise into ¾-inch strips. This makes them easier to eat and showcases that crispy coating. The inside should be juicy and tender.
Assemble the Bowls (2 minutes): Divide rice among serving bowls. Arrange sliced katsu over the rice. Add a generous portion of cabbage slaw on the side. Top with soft-boiled egg halves, sliced scallions, and sesame seeds. Drizzle generously with tonkatsu sauce or serve it on the side for dipping.
Serving Ideas for Every Occasion
Traditional Japanese Style: Serve the Japanese katsu bowls with miso soup, pickled vegetables, and green tea for an authentic experience that transports you to Tokyo.
Bento Box Lunch: Pack components separately in a bento box – rice in one compartment, sliced katsu in another, sauce in a small container. Perfect for work or school lunches.
Katsu Sandwich: Slice the cutlet and serve between soft white bread with tonkatsu sauce and cabbage for the famous Japanese katsu sando.
Curry Katsu Bowls: Pour Japanese curry sauce over the rice and katsu instead of tonkatsu sauce for a heartier, more substantial meal.
Party Platter: Cut katsu into bite-sized pieces and serve on toothpicks with various dipping sauces for an impressive appetizer that disappears quickly.
Family Dinner: Serve with sides of edamame, seaweed salad, and steamed vegetables for a complete, balanced meal everyone will love.
Date Night Elegance: Plate individually with artistic drizzles of sauce, carefully arranged vegetables, and attention to presentation for restaurant-worthy results.
Creative Variations and Global Fusion
Spicy Korean Style: Toss the fried katsu in gochujang sauce and serve with kimchi and pickled daikon for Korean-Japanese fusion.
Hawaiian Katsu: Serve over rice with macaroni salad and brown gravy for the popular Hawaiian plate lunch style.
Mexican Fusion: Use the crispy cutlet in tacos with cabbage slaw, avocado, and chipotle mayo for an unexpected but delicious combination.
Italian Inspired: Top with marinara sauce and mozzarella, then broil for a Japanese take on chicken parmesan.
Thai Twist: Drizzle with sweet chili sauce and top with fresh herbs like cilantro, mint, and basil for Southeast Asian flavors.
Breakfast Katsu: Top with a fried egg and serve with hash browns for a hearty breakfast that’s anything but ordinary.
Cheese Katsu: Pound the cutlet thin, place cheese in the center, fold and seal, then bread and fry for a molten cheese center.
Curry Cheese: Pour Japanese curry over the katsu and top with melted cheese for an indulgent comfort food combination.
Vietnamese Banh Mi: Use the katsu in a baguette with pickled vegetables, cilantro, and sriracha mayo for fusion sandwich magic.
Chinese Sweet and Sour: Serve with sweet and sour sauce, pineapple chunks, and bell peppers over rice for Chinese-Japanese crossover.
Nashville Hot: Toss the fried cutlets in spicy cayenne butter for a Japanese take on Nashville hot chicken.
Teriyaki Glazed: Brush with teriyaki sauce after frying and serve with stir-fried vegetables for a sweeter, umami-rich version.
Mediterranean Style: Top with tzatziki, tomatoes, and cucumbers for a Greek-Japanese fusion that’s surprisingly delicious.
BBQ Ranch: Drizzle with BBQ sauce and ranch dressing for an American comfort food twist kids absolutely love.
Professional Tips for Restaurant Results
Cutlet Preparation: Even thickness is crucial for even cooking. Use a meat mallet and pound gently but firmly. Too thin and it dries out; too thick and the outside burns before the inside cooks.
Breading Secrets: Press panko firmly onto the meat – loose breading falls off during frying. For extra crunch, double-bread by repeating the egg and panko steps.
Oil Temperature: Maintain 350°F throughout cooking. Too hot and the coating burns before the meat cooks; too cool and you get greasy, soggy katsu. Adjust heat as needed between batches.
Panko Quality: Japanese panko creates a lighter, crispier crust than regular breadcrumbs. Don’t substitute regular breadcrumbs – the texture won’t be the same.
Draining Method: Always drain on a wire rack, never paper towels. Air circulation prevents steam from making the bottom soggy.
Resting Time: Let fried katsu rest for 2-3 minutes before slicing. This allows juices to redistribute and prevents them from running out when cut.
Sauce Balance: The tonkatsu sauce should be sweet, tangy, and savory in balance. Adjust the components to your taste – more sugar for sweetness, more Worcestershire for tang.
Rice Texture: Use Japanese short-grain rice for authentic texture. It should be sticky enough to pick up with chopsticks but not mushy.
Make-Ahead Strategy: Bread cutlets up to 4 hours ahead and refrigerate. Fry just before serving for maximum crispiness.
Storage Solutions: Leftover katsu reheats best in a 400°F oven for 8-10 minutes. Avoid microwaving which makes the coating soggy.
Complete FAQ Guide
Q: Can I use store-bought katsu sauce for these Japanese katsu bowls? A: Yes, bottled tonkatsu sauce is convenient and authentic. Bull-Dog brand is excellent. The homemade version costs less and lets you adjust sweetness and tanginess to taste.
Q: How can I make a vegetarian version of the katsu bowl? A: Use extra-firm tofu, pressed and sliced into ½-inch slabs. The breading process is identical. Fry until golden and crispy on both sides.
Q: Is it possible to bake the katsu instead of frying it? A: Yes, though the texture won’t be identical. Spray breaded cutlets with oil and bake at 425°F for 15-20 minutes, flipping halfway. It’s healthier but less crispy.
Q: Can I prepare the breaded meat in advance and fry it later? A: Absolutely. Bread cutlets up to 4 hours ahead, cover, and refrigerate. Fry just before serving for best results. Don’t bread more than a day ahead or the coating gets soggy.
Q: What can I substitute for panko breadcrumbs if I don’t have any? A: Regular breadcrumbs work but won’t create the same light, crispy texture. Crushed cornflakes are a better substitute that provides good crunch.
Q: How long does the homemade katsu curry sauce last in the fridge? A: Homemade tonkatsu sauce keeps for up to 2 weeks in the refrigerator in an airtight container. The flavors actually improve after a day or two.
Q: Can I freeze leftover katsu for future meals? A: Yes, freeze fried katsu wrapped tightly for up to 3 months. Reheat from frozen in a 375°F oven until heated through and crispy again.
Q: What side dishes pair well with a katsu bowl? A: Miso soup, edamame, seaweed salad, pickled vegetables, cucumber salad, or steamed broccoli all complement Japanese katsu bowls beautifully.
Q: How do I reheat a katsu bowl without losing its crispiness? A: Reheat the katsu separately in a 400°F oven for 8-10 minutes. Warm rice in the microwave with a damp paper towel over it to prevent drying out.
Q: Are there any gluten-free alternatives for this recipe? A: Use gluten-free flour and panko breadcrumbs, and check that your sauces are gluten-free. Many Asian sauces contain gluten, so read labels carefully.
Q: Can I use a different type of meat for the katsu? A: Turkey cutlets, fish fillets, or even shrimp work beautifully. Adjust cooking times based on thickness – fish and shrimp cook much faster than chicken or pork.
Q: How can I adjust the spice level of the katsu curry sauce? A: Japanese curry isn’t typically spicy, but you can add cayenne pepper, chili oil, or fresh chilies to increase heat. Start with small amounts and adjust to taste.
Q: Why is my breading falling off during frying? A: Make sure the meat is completely dry before breading, press panko firmly to adhere, and let breaded cutlets rest for 5 minutes before frying to help coating set.
Q: Can I air fry the katsu? A: Yes, spray breaded cutlets well with oil and air fry at 400°F for 12-15 minutes, flipping halfway. The texture will be crispier than baked but not quite as good as deep-fried.
Q: What’s the difference between chicken katsu and pork katsu? A: Mainly the protein used. Pork katsu (tonkatsu) is traditional in Japan and has slightly more flavor. Chicken katsu is milder and often preferred by kids and those who don’t eat pork.
Perfect Ending
These quick Japanese katsu bowls prove that authentic international cuisine doesn’t have to be complicated or time-consuming. With simple techniques and readily available ingredients, you create something that rivals the best Japanese restaurants but costs a fraction of the price.
What makes this recipe special is how it delivers on every level – the satisfying crunch of perfectly fried katsu, the comforting warmth of steamed rice, the bright freshness of cabbage slaw, and that incredible sweet-savory tonkatsu sauce tying everything together. Each component is simple, but together they create something memorable.
The beauty of mastering Japanese katsu bowls is how versatile they become once you understand the basics. Change up the protein, try different sauces, experiment with toppings – the framework stays the same but the possibilities are endless.
But perhaps the best thing about this recipe is how it brings people together around the table. There’s something universally appealing about crispy, crunchy comfort food served in a beautiful bowl. Kids love it, adults appreciate the authentic flavors, and everyone asks for seconds.
So heat up that oil, set up your breading station, and get ready to create Japanese katsu bowls that will make you wonder why you ever bothered with takeout. This is comfort food at its finest – satisfying, delicious, and surprisingly simple to make at home.
Quick & Easy Japanese Katsu Bowls: A 15-Min Guide
Enjoy the rich flavors and textures of a classic Japanese katsu bowl made with crispy breaded meat, aromatic rice, and savory curry or tonkatsu sauce. This 15-minute recipe is perfect for a quick and satisfying meal in the comfort of your own kitchen.
Ingredients
- Thinly sliced meat (chicken, pork, or tofu)
- Panko breadcrumbs
- Eggs
- Cooked rice
- Katsu curry or tonkatsu sauce
- Optional: shredded cabbage
- Optional: pickled ginger
- Optional: green onions
Directions
- Begin by preparing your choice of meat and dipping it in beaten eggs.
- Coat the meat generously with panko breadcrumbs for a crispy texture.
- Fry the breaded meat until golden brown and cooked through.
- Serve the crispy katsu over a bed of steamed rice.
- Drizzle with katsu curry or tonkatsu sauce for an authentic flavor.
- Garnish with shredded cabbage, pickled ginger, and green onions for extra freshness.
- Enjoy your quick and satisfying Japanese katsu bowl!